See how EasyCLIQ Photo Edit takes a jewellery photo from cutout to finished image: AI cutout fixes, sparkling stones, new backgrounds, shadows and your logo.
For most jewellers, editing is the last manual step between a good capture and a photo that is ready to publish. Tidying the edges of a cutout, bringing back the sparkle of the stones, choosing a background, adding a shadow and stamping the logo: each is a small job, but across a full collection they add up to hours at an editing desk.
In EasyCLIQ, all of that happens in Photo Edit, inside the same software that captured the photo, with Magnic AI handling the repetitive parts. This guide explains what Photo Edit does, walks through editing a ring from cutout to finished image step by step, and answers common questions about AI photo editing for jewellery.
Key takeaways
- Photo Edit is built into the EasyCLIQ software, beside Shooting and Video Edit, so photos are edited where they are captured, with no exporting to separate editing software.
- The cutout is made when the photo is captured. Magnic AI’s Tap fix and Area map, plus manual tools, handle any corrections.
- One panel each for the look, the scene, the shadow and your logo takes a photo from cutout to a finished, branded image, with no Photoshop skills needed.
- Save one photo or the whole shoot at once, in the file type and quality you choose.
What EasyCLIQ Photo Edit does: the key features
Built into your EasyCLIQ workflow
Photo Edit sits in the same window as Shooting and Video Edit. A photo you have just captured opens straight in the editor, with the rest of the shoot in the filmstrip below, so there is nothing to export or import along the way.
A clean cutout from the start
The background is removed as the photo is captured. If an edge needs attention, Magnic AI’s Tap fix and Area map correct it, and manual controls (gray range, edge, smoothing, denoise, a pen and an eraser) are there for fine work.
Stones that sparkle, metal that stays true
The Look panel’s Stones control finds the stones and boosts their sparkle and clarity while leaving metal and skin untouched. One-click looks (Auto, Brighter, Warm, Studio and B&W) and sliders for brightness, contrast, saturation, highlights, shadows, hue, warmth and sharpness cover the rest.
A background for every channel
Place the piece on a plain colour for marketplaces and product pages, or in a styled scene (silk, marble, wood, greenery, mountain or studio) for social media and campaigns. You can also import a backdrop of your own.
Finishing touches included
A soft, hard or floor shadow grounds the piece, and your logo is stamped on every save in the corner, size and angle you set. Resize, Text and Publish tools sit in the same sidebar.
Nothing is lost
Hold to compare the result with the original at any moment. Your earlier edits are kept, and you can start again from the raw capture whenever you want.
Step by step: editing a jewellery photo in EasyCLIQ Photo Edit
This is how the ring in this article went from cutout to finished image.
01
Open the photo in Photo Edit and check the cutout
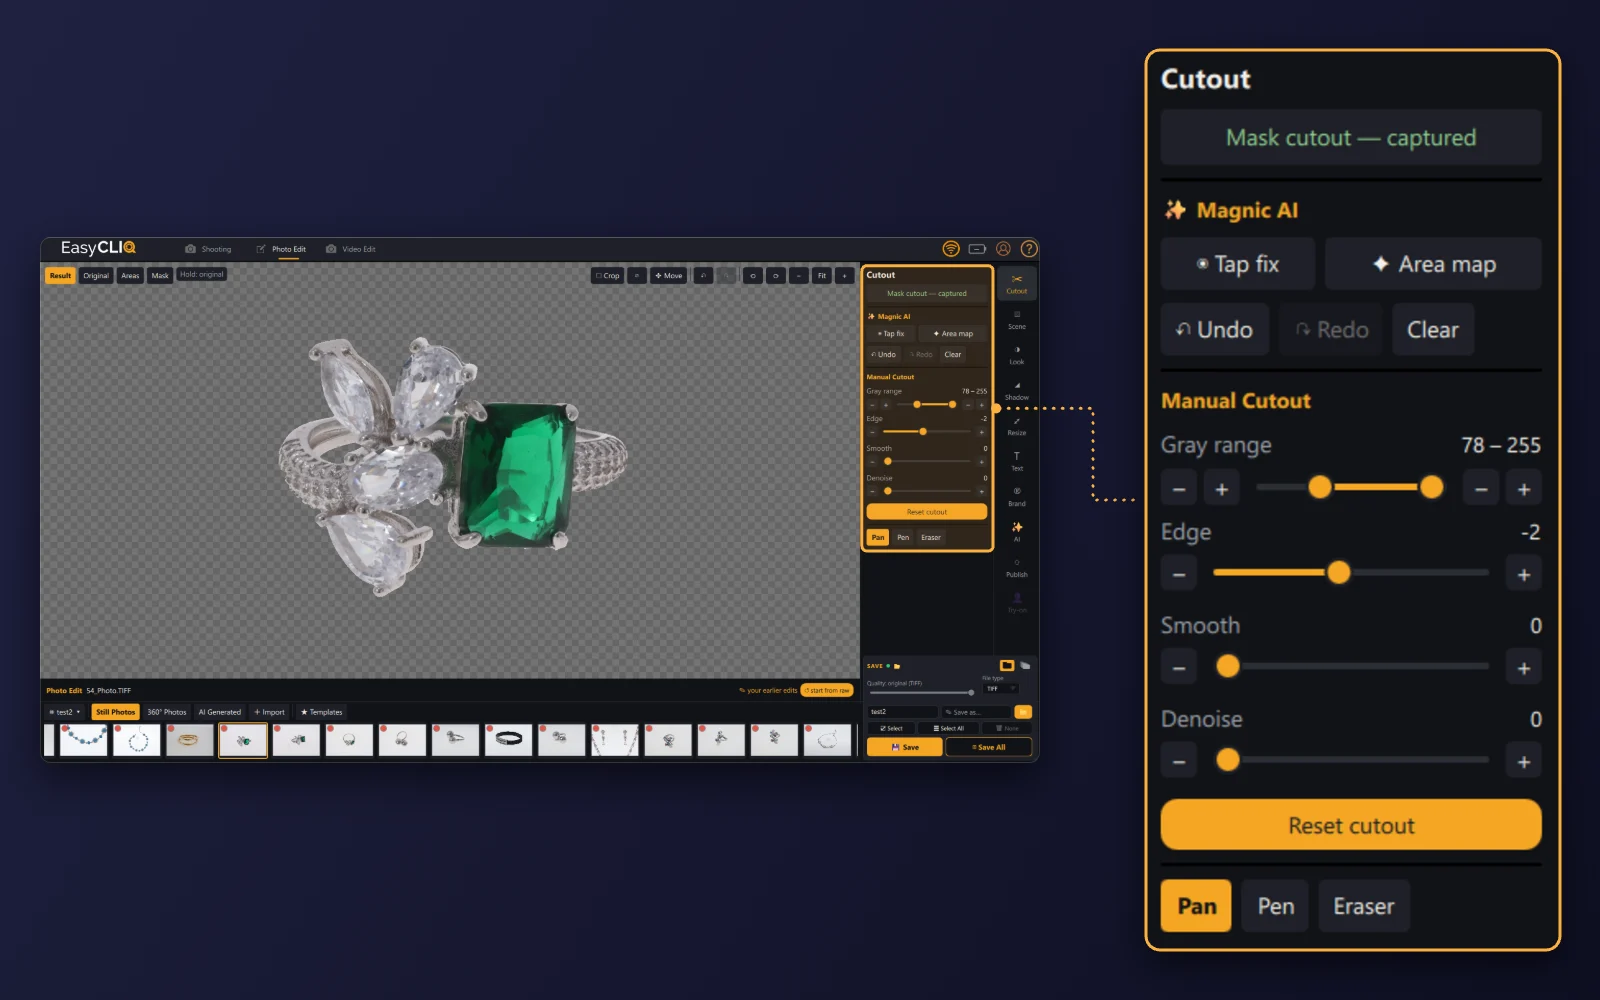
- Open: Select the photo in the filmstrip under Photo Edit. The Cutout panel shows that the cutout was captured with the photo.
- Fix: Use Magnic AI’s Tap fix or Area map to correct any spot the cutout missed, with Undo, Redo and Clear to hand.
- Fine-tune: For delicate edges, adjust gray range, edge, smoothing and denoise, or work on the cutout by hand with the pen and eraser.
02
Bring out the sparkle with Look
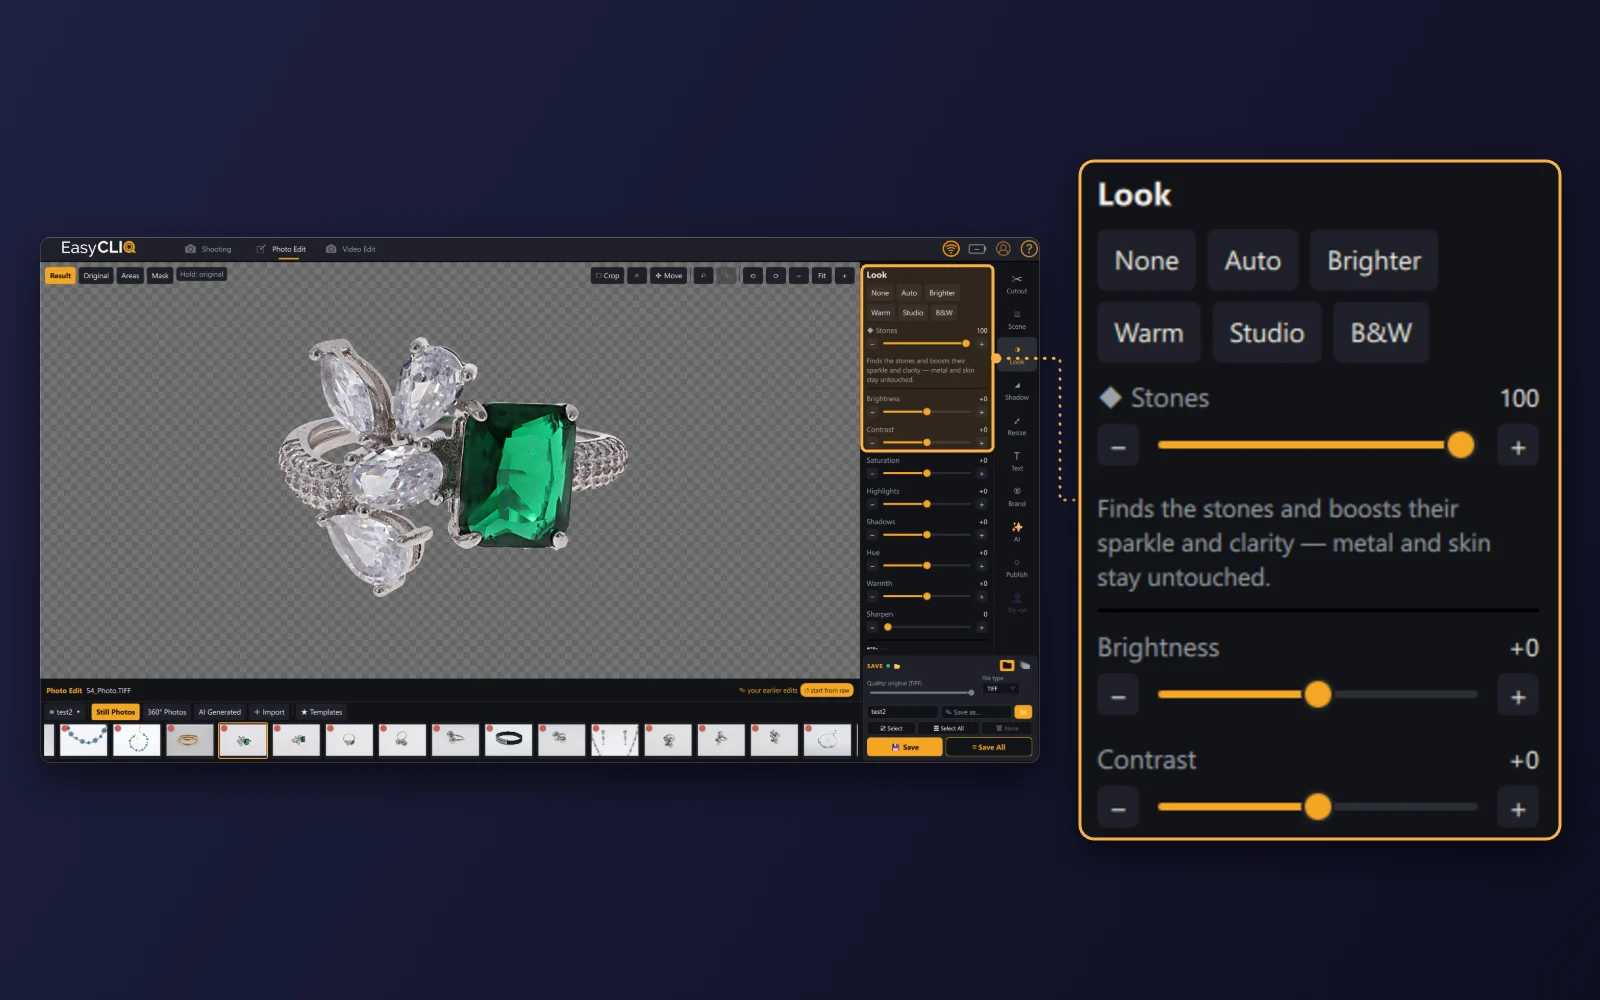
- Stones: Raise the Stones control to boost the sparkle and clarity of the stones. Metal and skin stay untouched.
- Looks: Pick Auto, Brighter, Warm, Studio or B&W as a starting point, or leave it at None.
- Adjust: Fine-tune brightness, contrast, saturation, highlights, shadows, hue, warmth and sharpness with the sliders.
03
Choose a background colour
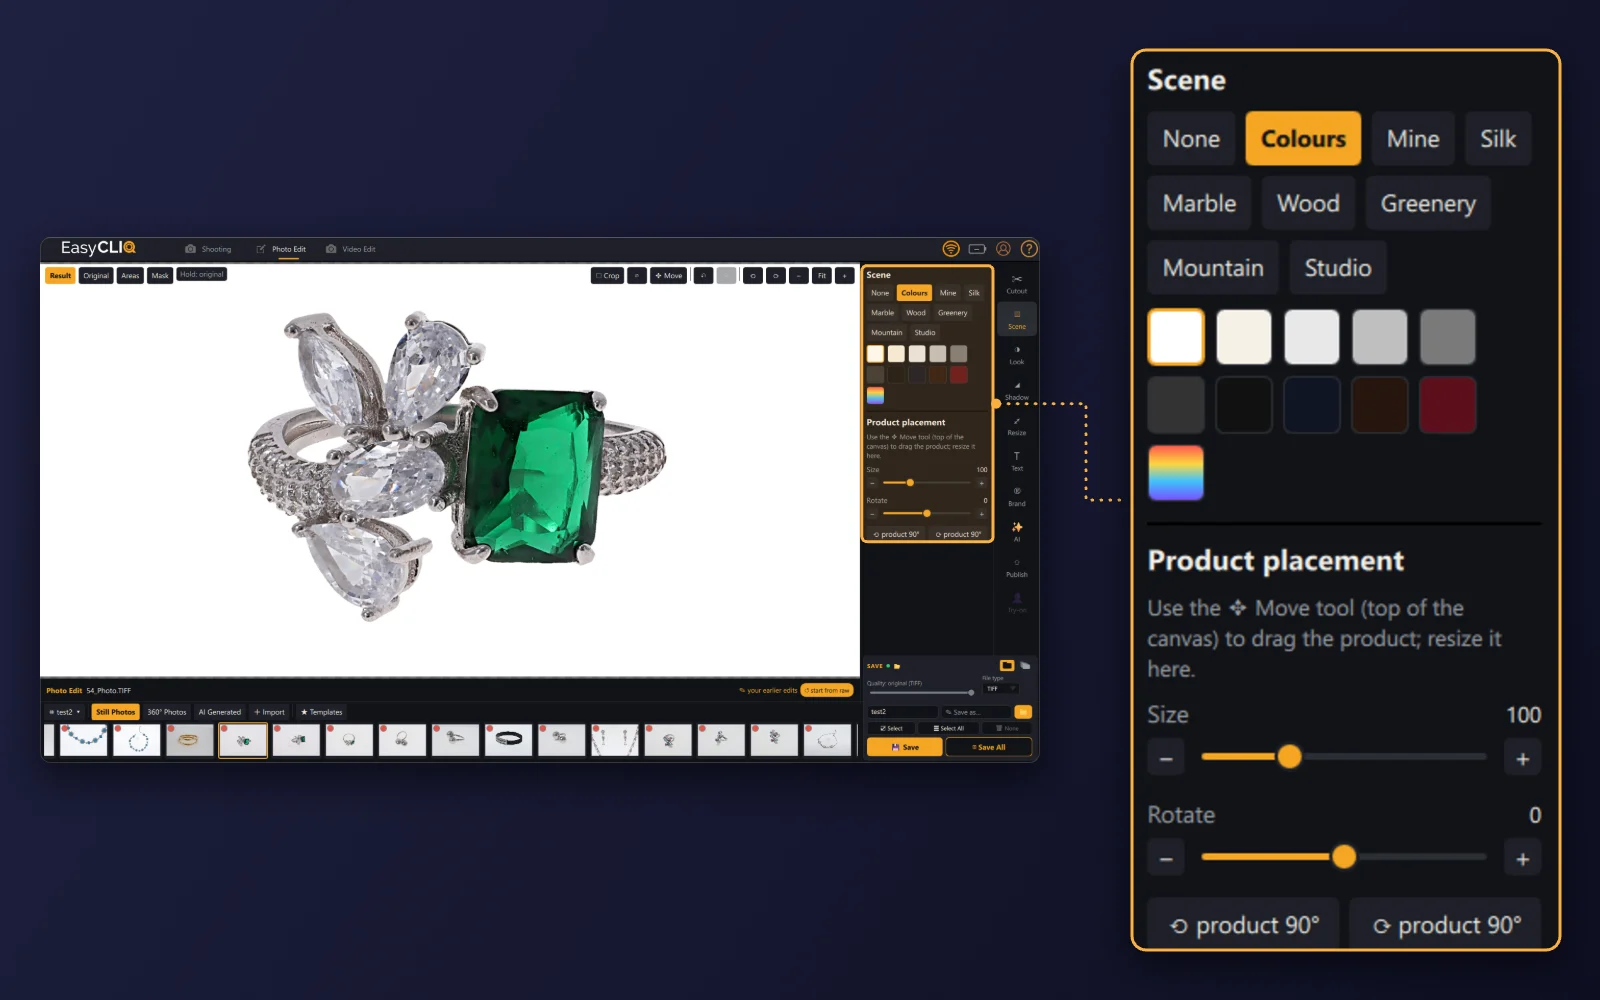
- Colours: Under Scene, choose Colours and pick white for marketplaces and product pages, or ivory, grey, black, navy, brown, maroon or a custom colour to match your brand.
- Placement: Drag the piece with the Move tool at the top of the canvas, and set its size and rotation, including 90° turns.
04
Or set the piece in a styled scene
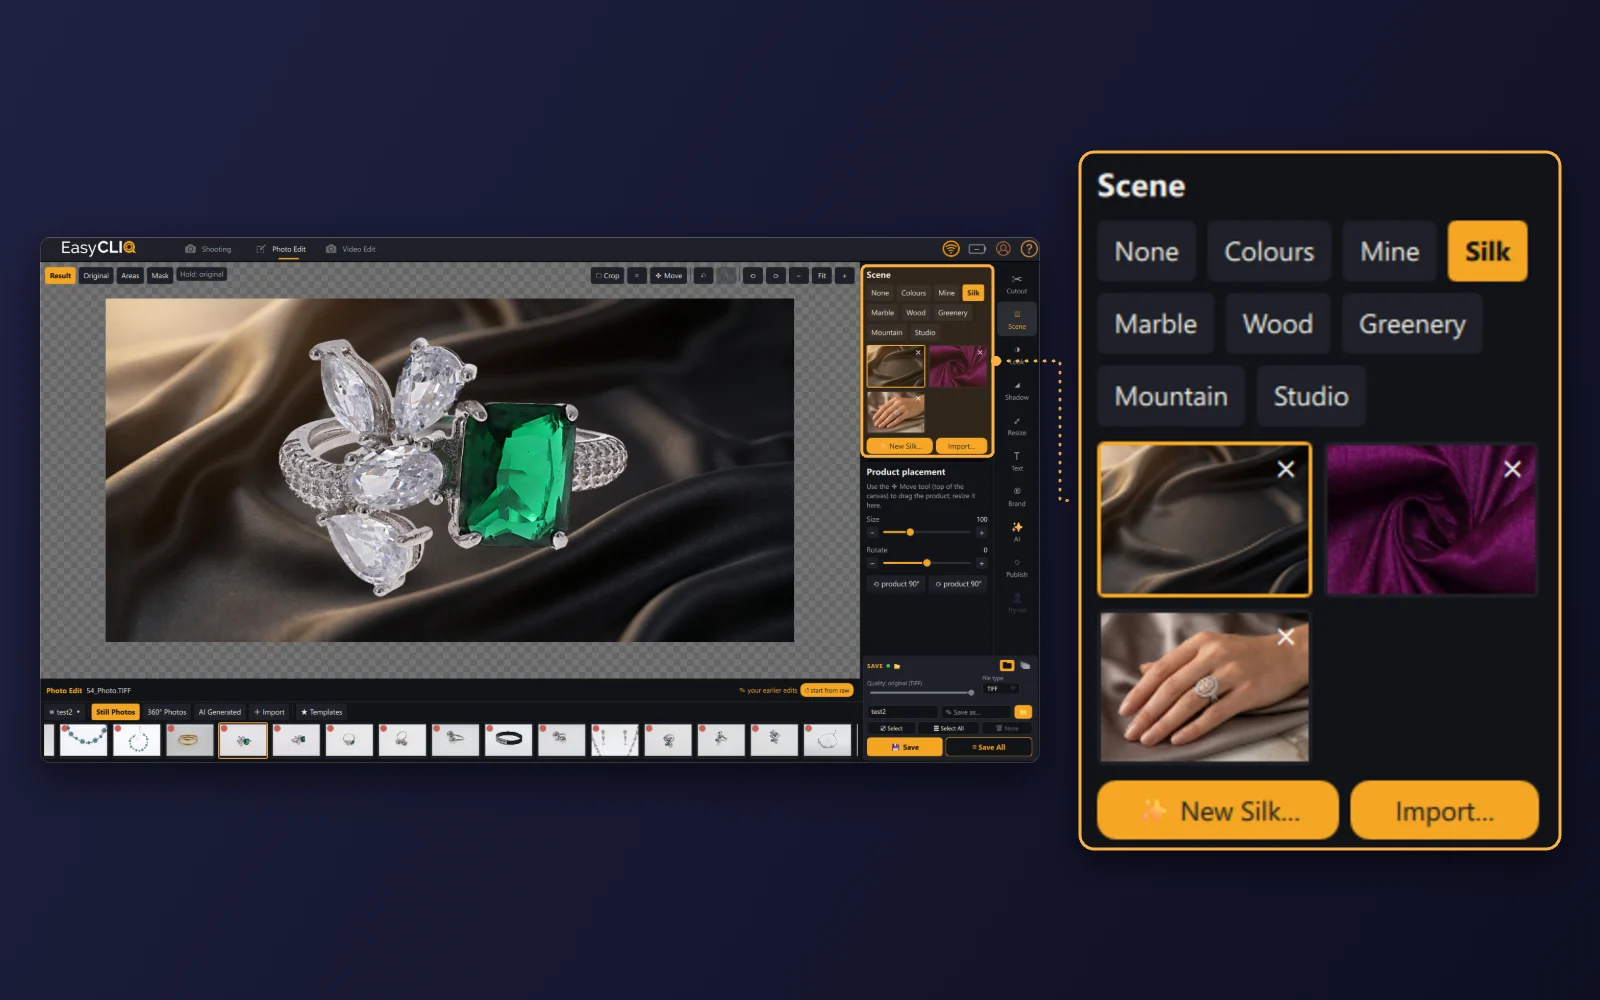
- Scenes: Switch to Silk, Marble, Wood, Greenery, Mountain or Studio to place the piece on a styled backdrop for social media, banners and campaigns.
- Your own backdrops: Create a new silk backdrop or import one of your own, so the images match your brand.
05
Add a shadow
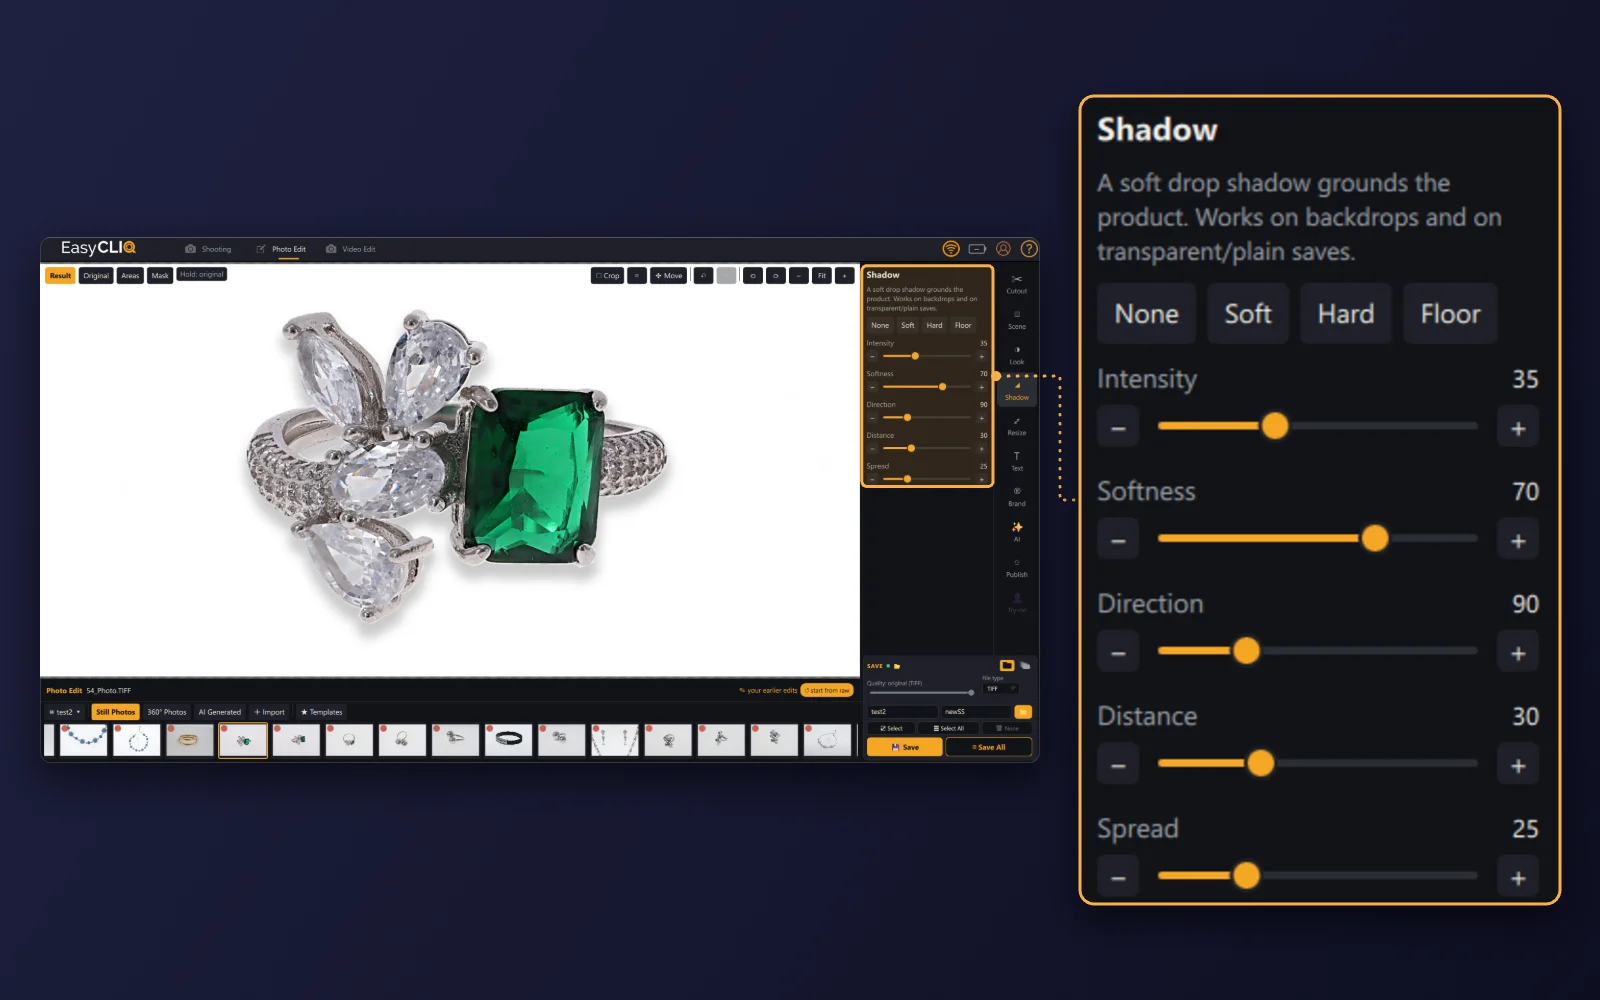
- Style: Choose a soft, hard or floor shadow to ground the piece, so it looks placed rather than pasted on.
- Control: Set intensity, softness, direction, distance and spread. The shadow works on backdrops and on transparent or plain saves.
06
Stamp your logo
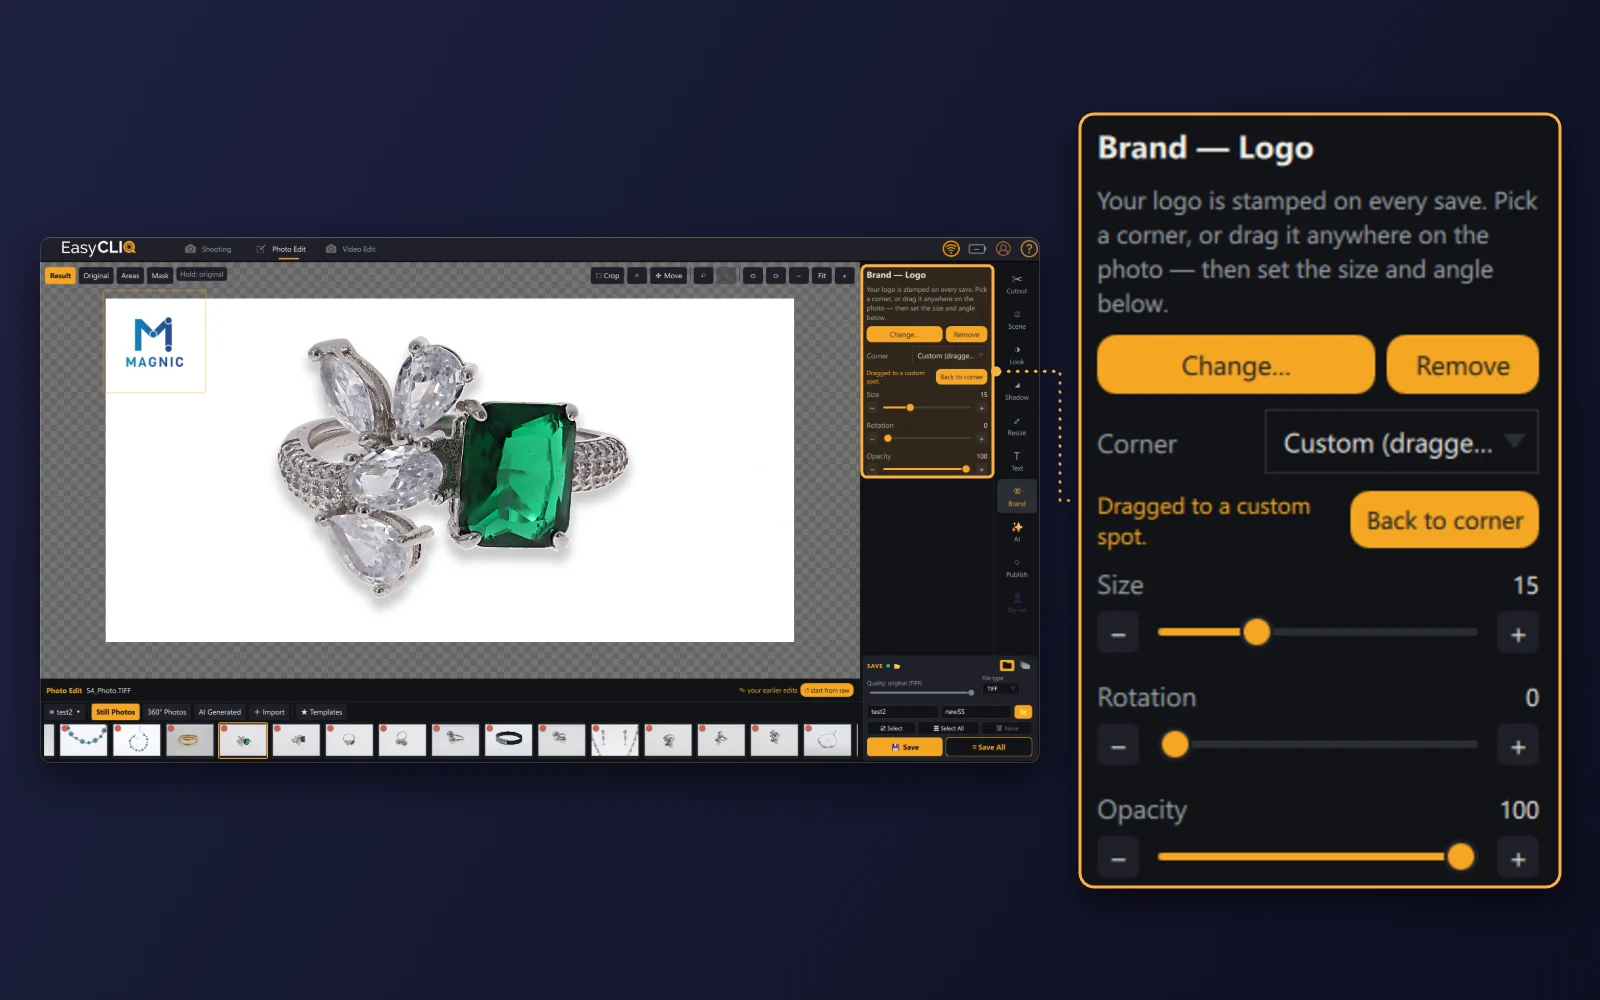
- Logo: Add your logo once under Brand and it is stamped on every save.
- Position: Pick a corner or drag the logo anywhere on the photo, then set its size, rotation and opacity.
07
Save one photo, or the whole shoot
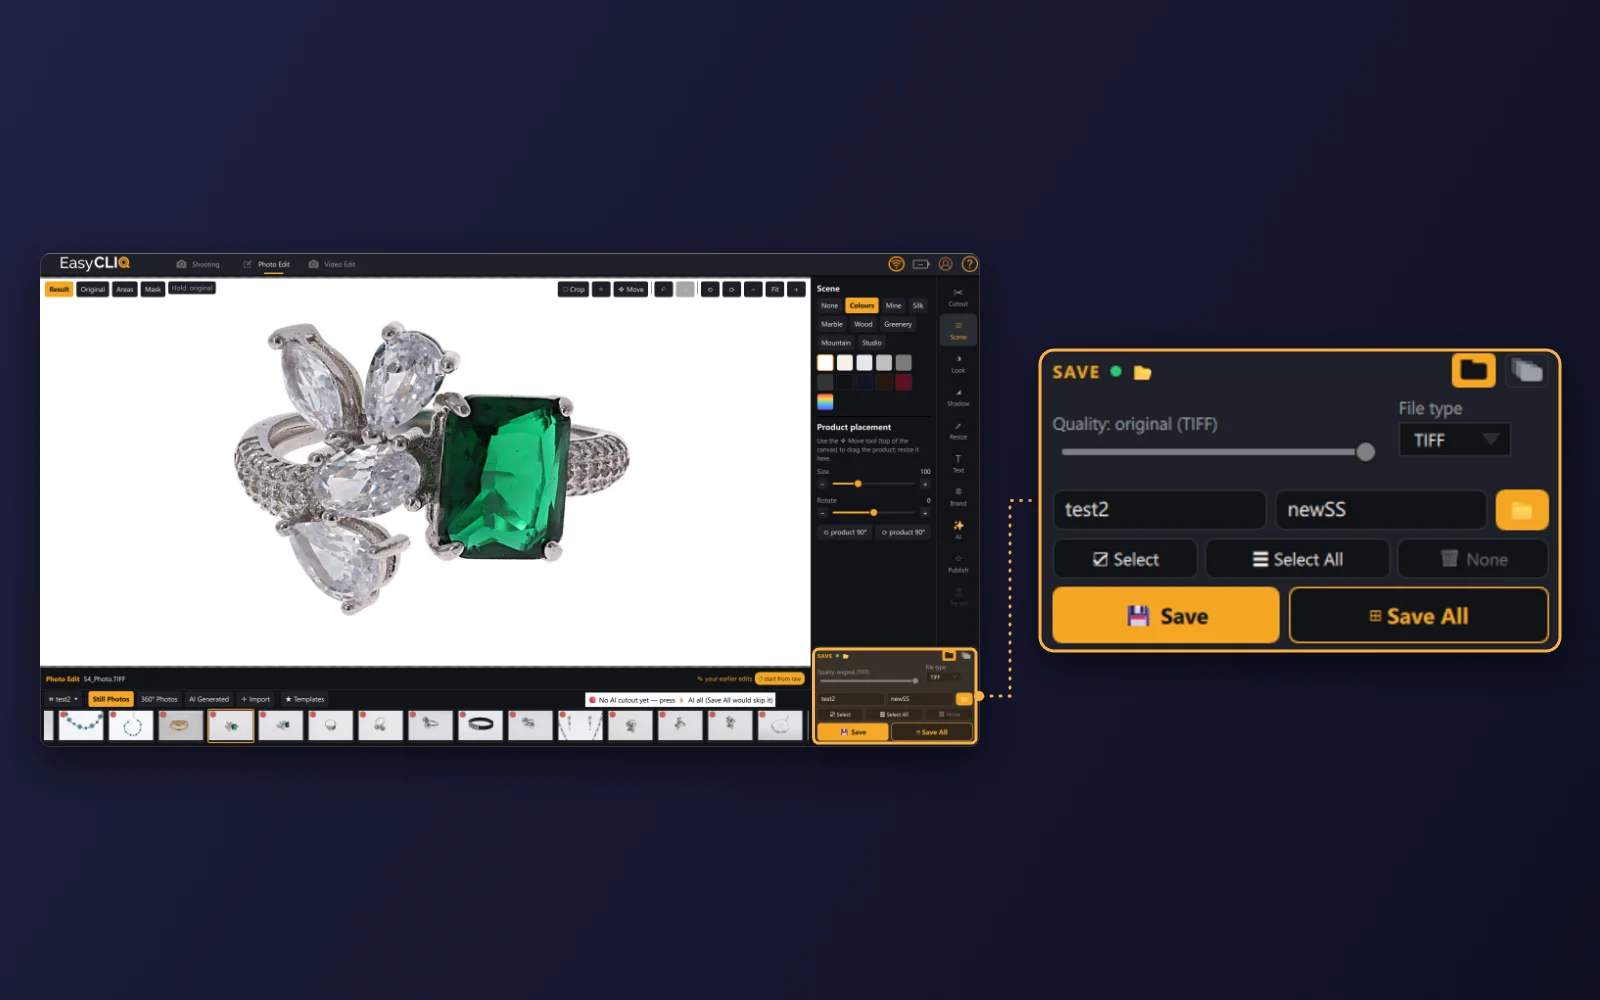
- Format: Choose the file type and quality, and where to save. The ring here was saved as an original-quality TIFF.
- Batch: Use Select or Select All in the filmstrip, then Save All to save the set in one go. If a photo has no AI cutout yet, the software flags it: run AI all first, or Save All will skip that photo.
The result
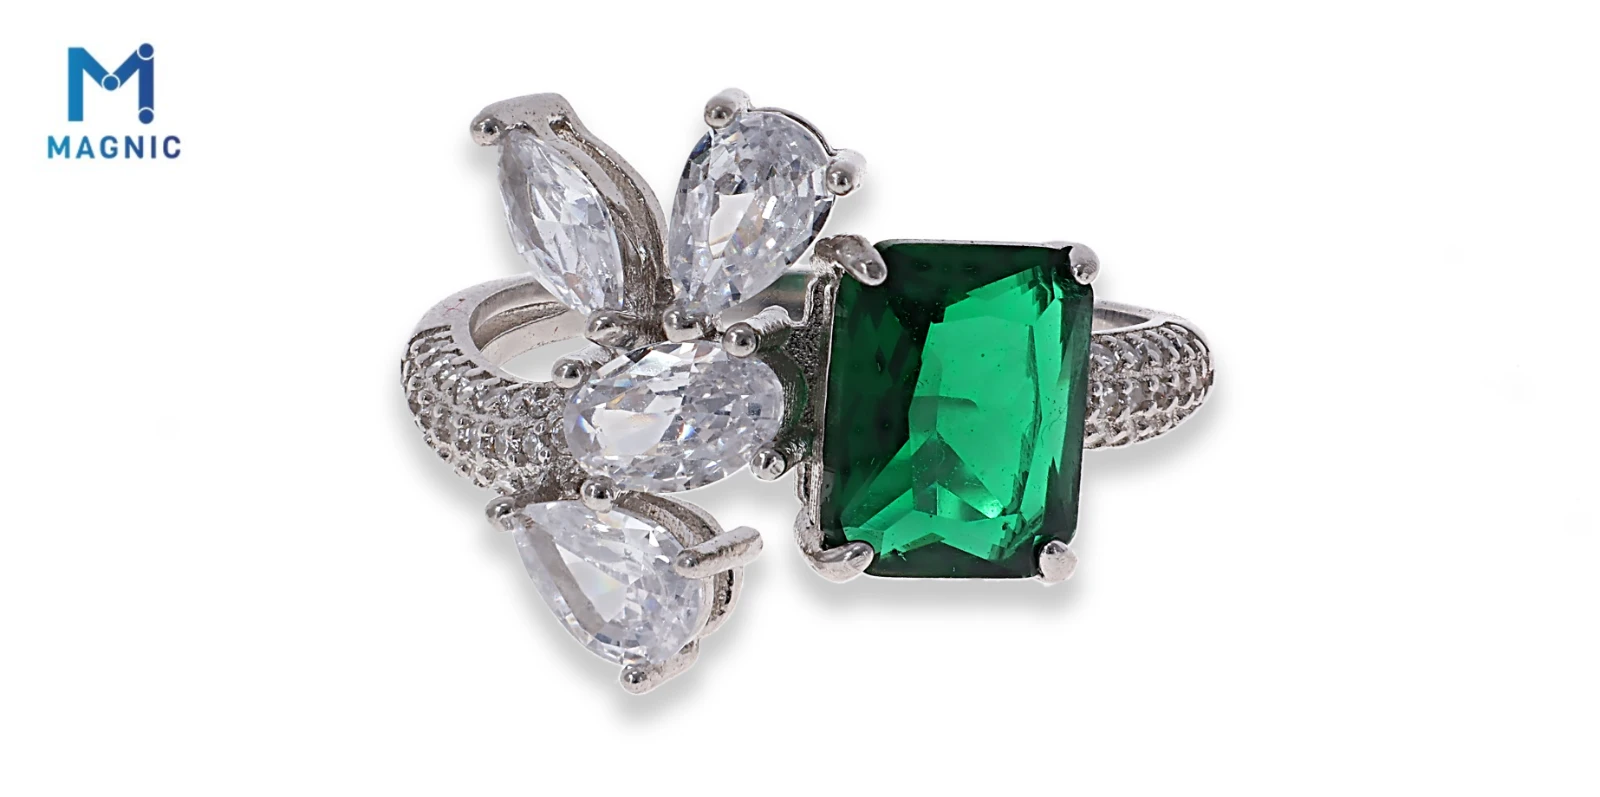
There you have it: the same capture, now on a clean white background with a soft shadow and the logo in the corner, ready for a product page, a marketplace listing or a catalogue.
Switch the scene to silk, marble or wood and save again, and the same shot is ready for Instagram, a banner or a campaign as well, without another photo session.
FAQ: AI photo editing for jewellery
What is AI photo editing for jewellery?
It is software that does the repetitive parts of editing for you: removing the background, correcting the cutout, lifting the sparkle of the stones and placing the piece on a new background. You choose the settings instead of working pixel by pixel. In EasyCLIQ, it is built into Photo Edit, in the same software that captures the photos.
What are the benefits of AI photo editing tools?
Less manual work, because cutouts and routine corrections are automatic. Consistent results, with the same backgrounds, shadow styles and logo on every piece of a collection. Faster publishing, because a whole shoot can be saved in one go. And more time for styling and creative work instead of repetitive fixes.
How good is AI photo editing for jewellery?
It handles most everyday work well: clean cutouts on solid pieces, brighter stones, even backgrounds and consistent shadows. Very fine chains, open filigree and clear stones against a light background can still need a manual touch-up, which is why Photo Edit keeps manual cutout tools and a hold-to-compare view of the original next to the AI.
Do I need Photoshop or editing skills to use EasyCLIQ Photo Edit?
No. Photo Edit works with one-click options and sliders: pick a look, a background, a shadow style and a logo position. Studio operators, sales staff and marketing teams can produce finished images without waiting for a retoucher.
What can EasyCLIQ Photo Edit do?
Correct the cutout with Magnic AI or by hand, boost stone sparkle and adjust colour and exposure, place the piece on a plain colour or a styled scene, add a shadow, stamp your logo, and save one photo or a whole shoot in the file type you choose. Resize, Text and Publish tools sit in the same sidebar.
Can I edit a whole shoot at once?
Yes. Select the photos in the filmstrip, run AI all for any that do not have an AI cutout yet, and use Save All to save the set in one go.
From capture to catalogue in one place
Editing does not have to be a separate job at a separate desk. With Photo Edit, the same software that captures a piece also cleans the cutout, brings out the stones, sets the scene and adds the shadow and logo, so a photo can go from capture to catalogue, marketplace or social media without leaving EasyCLIQ.
Book a free demo and we will capture a piece from your own collection and take it through Photo Edit with you.