A single photo cannot keep a whole piece of jewellery in focus. See what happens at 100% zoom, and how multi-shot focus stacking keeps every detail sharp.
Shoppers do not just look at a jewellery photo — they zoom into it. They pinch to check the stone setting, the finish of the gold and the hallmark stamped inside a bangle. At that moment, the photo either holds up or falls apart.
The comparisons in this article come from two photographs of the same gold bangle. At normal size they look almost identical. At 100% zoom, one breaks up into soft, smeared pixels while the other stays crisp. The difference is how each was captured: in a single frame, or in several frames merged into one.
Why a single shot cannot keep a whole piece sharp
A lens focuses on one plane at a time. Anything in front of or behind that plane becomes progressively softer, and the zone that stays acceptably sharp is called the depth of field.
At the close distances jewellery is photographed from, that zone is very shallow — often just a few millimetres. A bangle, ring or necklace is much deeper than that from its nearest edge to its farthest, so a single frame can only show part of the piece sharply. Closing down the aperture helps a little, but beyond a point it softens the whole image and needs far more light.
What happens at 100% zoom
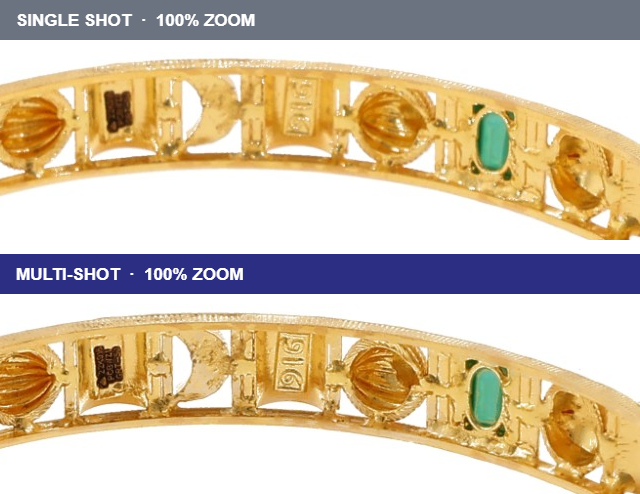
Look at the back wall of the bangle, the part furthest from the camera. In the single shot it falls outside the depth of field: the 916 hallmark melts into a smudge, the stamp beside it cannot be read and the ribs on the gold beads lose their edges.
In the multi-shot image, the same area is as sharp as the front. The hallmark is clear, the characters in the stamp beside it can be made out and every rib on the beads is distinct. Zooming cannot add detail a camera never recorded — it only enlarges the blur, which is what looks like “broken” pixels.
It is not only the far side
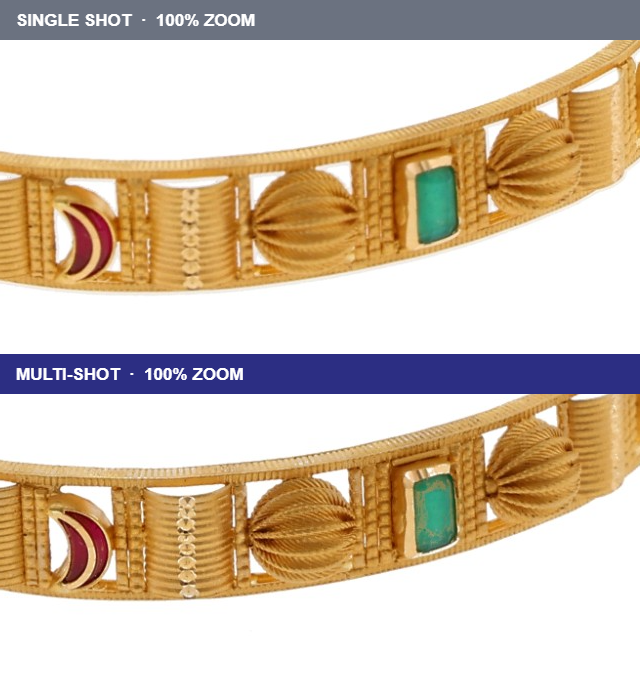
The front of the bangle shows a difference too. In the multi-shot image the fine ribs on the gold beads, the dotted granulation between them and the engraved lines along the rim are crisper, and even the texture inside the green stone is visible.
These are exactly the details a buyer zooms in to judge: the craftsmanship, the finish and the quality of the setting.
How multi-shot capture works
Multi-shot capture, usually called focus stacking, takes a series of photographs of the same view, each focused at a slightly different depth — from the front edge of the piece to the back. Software then picks the sharpest part of each frame and blends them into one image that is in focus from end to end.
Done by hand, it means moving the focus in small steps, keeping the camera and the jewellery perfectly still, and then aligning and blending the frames in editing software. Built into the studio workflow, it becomes part of taking the photograph.
Why it matters for selling jewellery
Every detail survives the zoom
Product pages and marketplaces let shoppers zoom in. A stacked image gives them real detail to look at instead of blur.
Hallmarks and stamps stay readable
A legible 916 hallmark or purity stamp shows buyers exactly what they are paying for, right on the product page.
Craftsmanship is visible
Filigree, granulation, engraving and stone settings are what set a piece apart — and they only sell if they can be seen.
One image works at every size
A sharp master image can be cropped for social media, enlarged for banners and printed in catalogues without falling apart.
Fewer doubts before ordering
When the photo shows the piece exactly as it is, buyers have fewer questions before they order and fewer surprises when it arrives.
Multi-shot capture on EasyCLIQ
Focus stacking is built into the EasyCLIQ software on the MINI, X1 and X3, alongside automated background removal, template memory and one-click web-ready publishing — so sharp, stacked images come out of the same studio workflow as the rest of the catalogue, without moving files into separate editing software.
On the X1 and X3, ten independently controllable lights with 90+ CRI keep gold and stones in true colour as well. The result is a photo that shows the piece the way it looks in the hand, even at 100% zoom.
A quick test for your own photos
- Open a product photo at 100% zoom, so one image pixel fills one screen pixel.
- Check the part of the piece furthest from the camera: the back of a bangle, the far side of a ring, the clasp of a necklace.
- Look at hallmarks, stamps and fine texture — are they crisp and readable, or soft and smudged?
- Compare the edges of stones and engraved lines at the front and at the back.
- If only a slice of the piece is sharp, the image is most likely a single shot with too little depth of field — and shoppers who zoom will notice.
Sharp from front to back
Shoppers judge jewellery by its details, and online they judge those details by zooming in. A single frame can only ever keep part of a piece sharp; multi-shot capture keeps all of it.
Book a free demo and we will photograph a piece from your own collection, so you can zoom into the result yourself.