A complete guide to 360 degree jewellery photography: the equipment, lighting, turntable settings and editing you need to shoot stunning 360° jewellery videos.
360 degree jewellery photography turns a piece slowly through a full circle on camera, so shoppers can study it from every side instead of guessing from one flat photo. For bangles, necklaces, earrings and rings alike, a 360° jewellery video shows the craftsmanship, the stone settings and the finish the way a customer would turn the piece in their hand at the counter.
This guide covers what 360-degree jewellery photography is, why it helps you sell, the equipment you need, how to shoot a 360° video step by step, how to light gold, diamonds and silver, the mistakes to avoid and how to optimise the result for e-commerce. The software screens and recordings in this article come from EasyCLIQ. For ring-specific tips, see our guide to 360-degree ring product photography.
What is 360-degree jewellery photography?
In 360-degree jewellery photography, the piece sits on a motorised turntable while a fixed camera records it turning, either as a continuous video or as a sequence of still frames taken every few degrees. Played back, the result is a smooth spin: a looping video on the product page, an animated GIF or an interactive viewer that shoppers drag to turn.
Because the camera, the lights and the turntable speed stay the same for every piece, a whole collection can be shot the same way, and each frame of the spin doubles as a product photo.
Benefits of 360° jewellery photography
Every angle in one view
Shoppers see the front, the sides, the back and the clasp, instead of piecing a design together from a few separate photos.
Craftsmanship on show
Gold finishing, filigree, gemstone settings and enamel work catch the light as the piece turns, which a still photo can only hint at.
A more interactive experience
A piece that moves, or that shoppers can drag to turn, keeps them on the product page and feels closer to handling it in the shop.
Confident buying decisions
When customers can evaluate a piece from every side before they buy, there are fewer surprises when it arrives.
Equipment required for 360° jewellery photography
Macro lens
Jewellery is small and detailed. A macro lens lets a ring, an earring or the clasp of a necklace fill the frame and records the setting, the stones and any hallmark.
DSLR or mirrorless camera
A camera you can set manually and control from a computer, so exposure, focus and white balance stay locked for the whole rotation. EasyCLIQ works with Canon DSLR and mirrorless cameras connected over USB.
Motorised turntable
A turntable that turns smoothly at a steady, adjustable speed. A top turntable lets necklaces and earrings hang naturally; a bottom one suits bangles and rings.
Diffused lighting
Soft, even light from several sides, through diffusion or an enclosed light box, so reflections on polished metal stay smooth from every angle.
A stable tripod or fixed camera mount
Any movement of the camera shows up as wobble in the spin. Use a solid tripod, or a studio where the camera is held on a fixed or robotic mount.
Editing software
Software to remove the background, correct colour, trim the spin to one clean rotation and export it in the sizes and formats you need.
How to shoot 360° jewellery videos
01
Clean the piece
- Polish: Remove fingerprints, dust and polishing residue, then handle the piece only with gloves.
- Check: Look for loose stones and bent prongs: a spin shows the piece from every side, flaws included.
02
Position the piece and the camera
- Centre: Place the piece exactly on the turntable’s axis so it turns on the spot. Hang necklaces and earrings from a top turntable; stand bangles and rings on the bottom one.
- Frame: Set the camera slightly above the piece, so a bangle or ring shows both its top and its side, and leave a margin so no part leaves the frame as it turns.
03
Set up the lighting
- Light: Use soft key lights on both sides and fill light from above or below.
- Check: Turn the piece through a few angles before recording, and adjust any light that flares or leaves a dark side.
04
Choose the turntable speed
- Slow and steady: A slower turn gives a smoother, sharper spin. A full turn in roughly 10 to 20 seconds is a comfortable pace for a product page loop.
- Direction: Decide whether the piece turns a full circle or swings out and back to show its best side.
05
Capture the frames or the video
- Settings: Lock exposure, focus and white balance in manual, so nothing changes during the rotation.
- Capture: Record a continuous video, or take a frame every few degrees: 24 to 36 frames per turn is a common balance, and 72 gives an extra-smooth spin.
06
Edit the final video
- Trim: Cut the clip to exactly one clean rotation, so it loops without a jump.
- Finish: Correct colour lightly, crop to the frame you need and export a compressed MP4 for the web.
Shooting a 360° video in EasyCLIQ
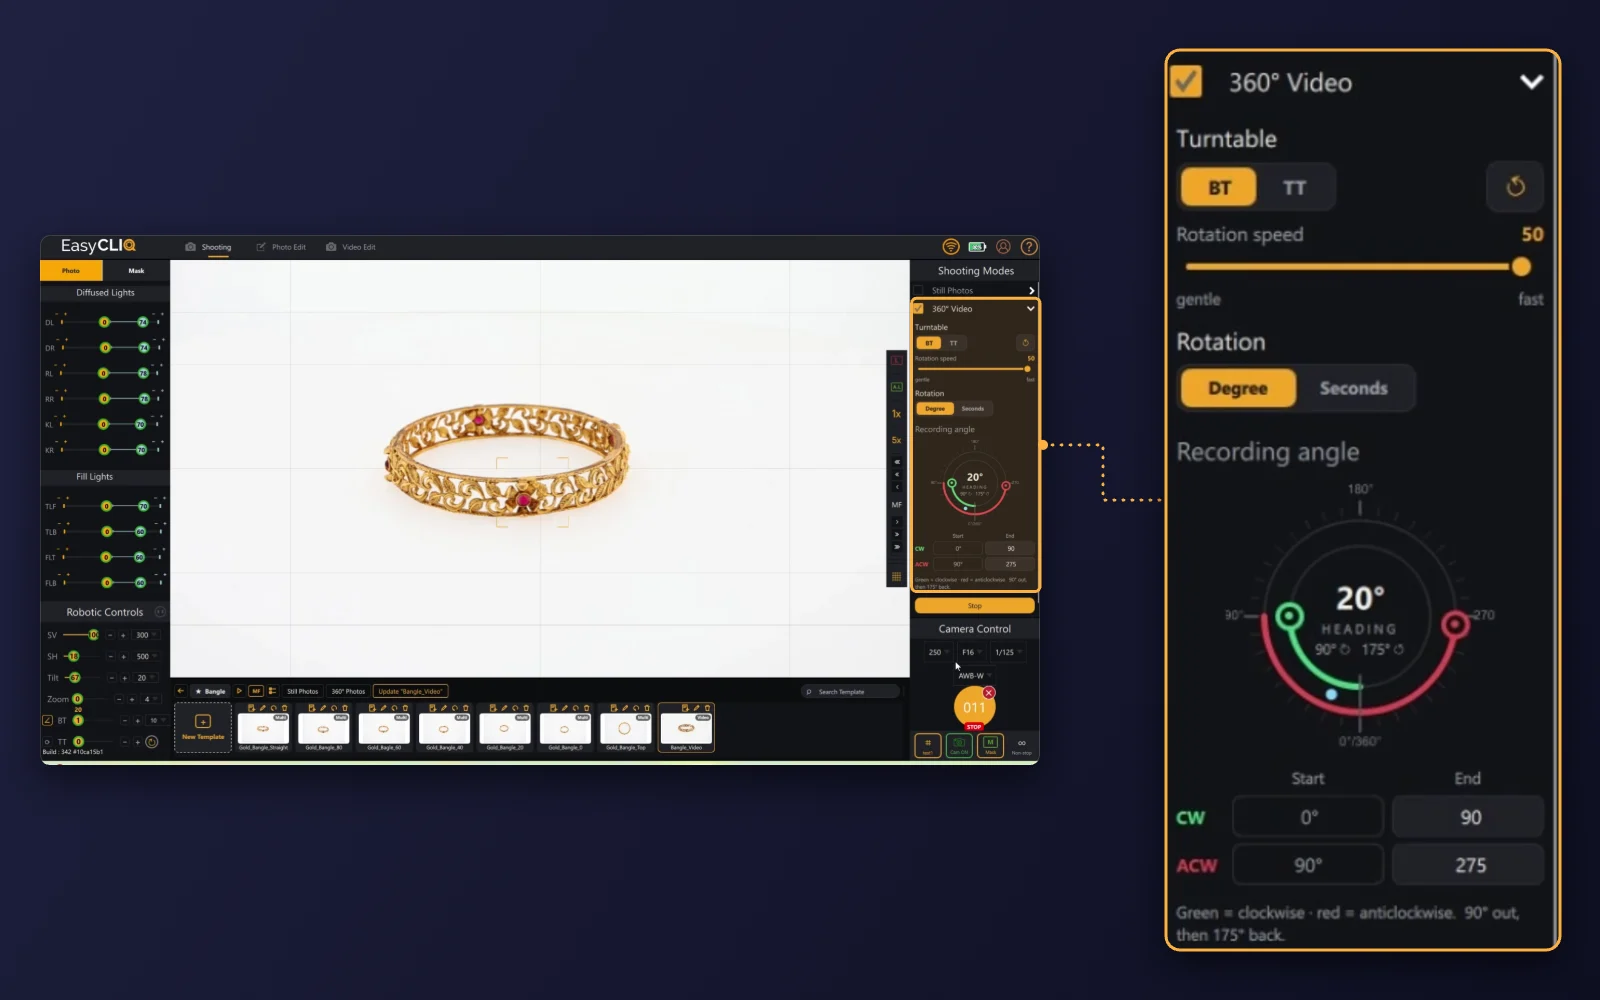
In the EasyCLIQ software, 360° Video is a shooting mode alongside Still Photos. You choose the bottom or top turntable, set the rotation speed from gentle to fast, and decide whether the recording runs by angle or by time.
By angle, a recording dial sets where the turn starts and ends, clockwise or anticlockwise, so a piece can swing 90° out and back or turn further. By time, you set the recording duration in seconds instead. The camera settings sit in the same window: the bangle shown here was shot at ISO 250, f/16 and 1/125 s. The two screen recordings alongside this article show both ways of recording, from setting up the shot to exporting the video.
Lighting setup for different jewellery types
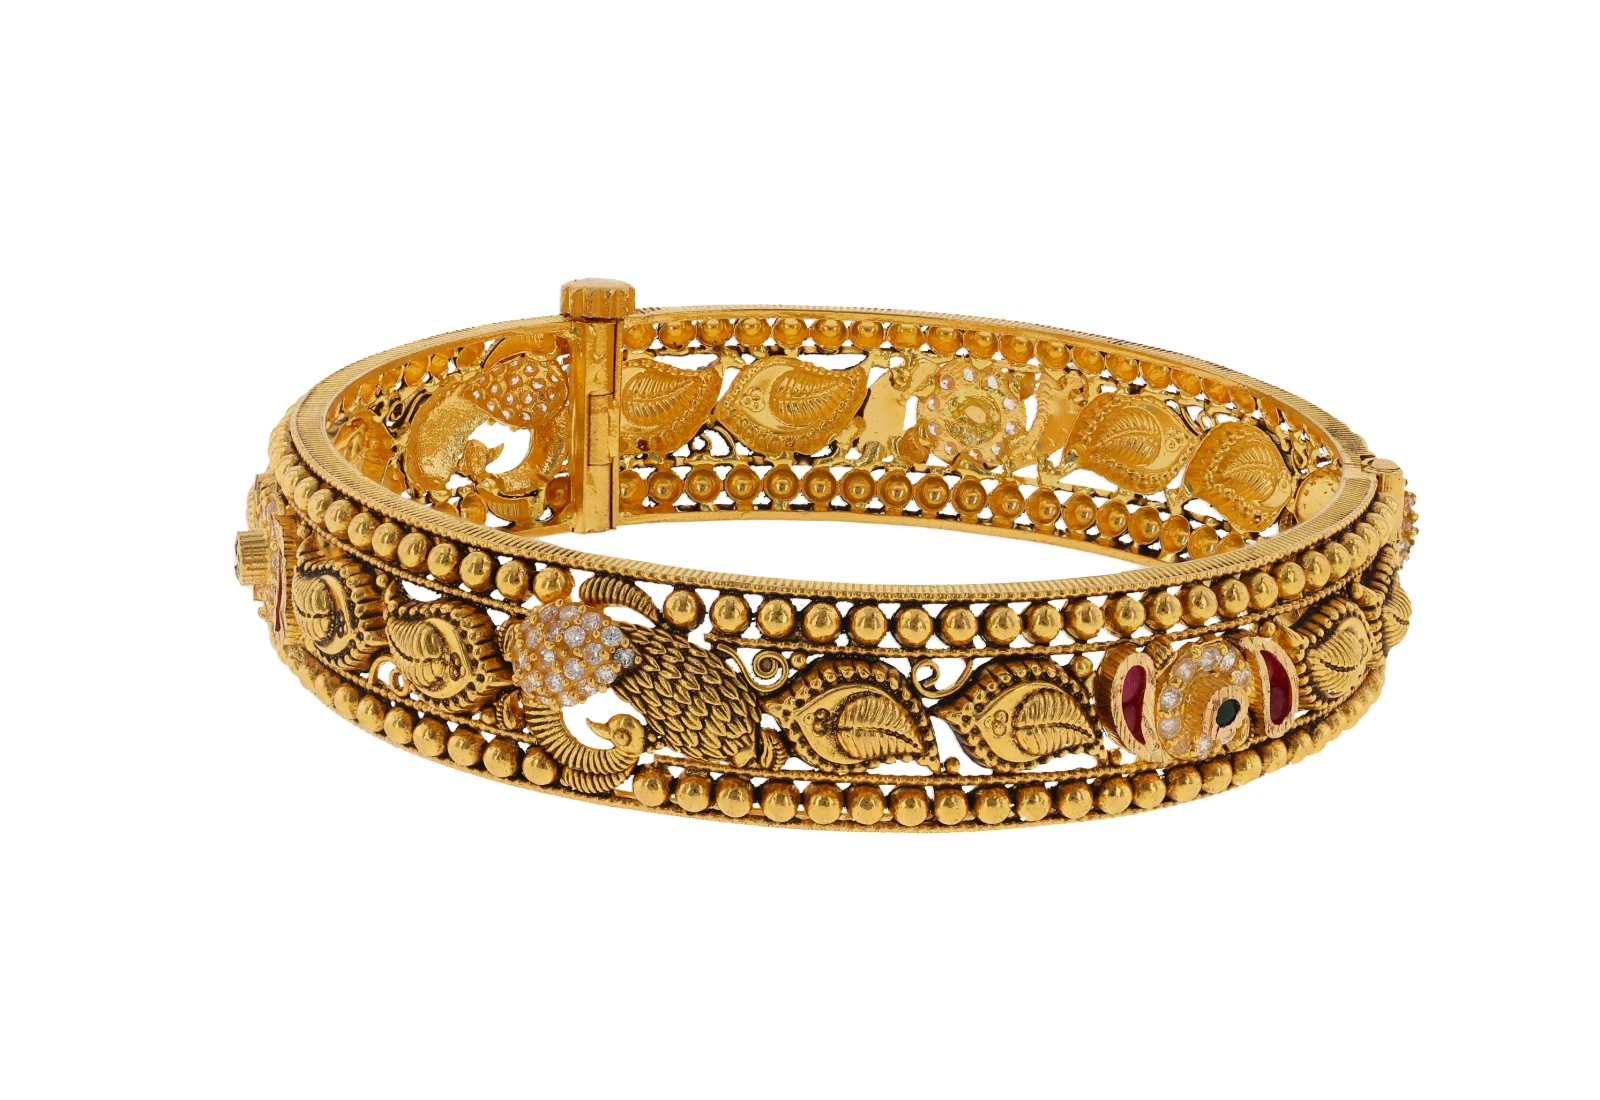
Every metal and stone reacts to light differently, and on a turntable the light has to work from every angle at once, not just from the front. Set up for the most reflective surface first, then check the piece at a few points of the rotation before you record. In the EasyCLIQ studio shown above, six diffused lights and four fill lights can each be adjusted on their own.
Gold, diamonds and silver
Gold: manage reflections
Large, soft light on both sides and above turns gold’s reflections into smooth highlights. Warmer light, around 3000K, brings out yellow gold; keep it diffused so the metal glows rather than burning out to white.
Diamonds: control glare
Soft light for the metal plus small, controlled points of light for sparkle. If facets flare as the piece turns, lower or diffuse the brightest light; a cooler temperature keeps white stones crisp.
Silver: consistent exposure
Silver and white gold reflect their surroundings and can swing from bright to dark as they turn. Use even, cool-neutral light towards 6000K, manual exposure and a white surround, so every angle matches.
Coloured stones and enamel
High-CRI light (90+) keeps rubies, emeralds and enamel work their true colour as they pass through the light.
Common mistakes to avoid
- Inconsistent lighting: one side brighter than the other flickers as the piece turns. Light evenly all round and lock the camera settings.
- Visible dust: every speck shows from some angle, and a spin replays it in every frame. Clean the piece, the turntable and the backdrop.
- Camera shake: any movement of the camera becomes wobble. Use a solid mount and trigger the camera from the software, not by hand.
- Incorrect focus: if only the front is sharp, the back blurs as it comes round. Focus manually, close the aperture or use focus stacking.
- Uneven rotation: an off-centre piece or a jerky turntable makes the spin wobble. Centre the piece and use a motorised turntable with a steady, adjustable speed.
- Over-editing: heavy retouching, oversaturated gold and added sparkle make the piece look different from the real thing. Correct gently, so what arrives matches what was on screen.
How to optimise 360° jewellery videos for e-commerce
- File size: keep a product page spin to a few megabytes or less. The bangle spin at the top of this article is a 13-second, 1280 × 720 MP4 of about 2 MB.
- Image sharpness: export at the size the video will be shown, from sharp source footage; enlarging a small video makes it soft.
- Mobile loading speed: compress the file, add a poster frame so the piece appears instantly, and let the video play muted and inline so phones play it in place.
- Video formats: MP4 (H.264) plays in every modern browser and is far smaller than a GIF of the same spin. Keep a GIF only where video is not accepted.
- Interactive product viewers: for a drag-to-turn experience, export the spin as a sequence of frames (for example 24 to 36 per turn) for a 360° viewer on your product page.
Finishing and exporting a 360° shoot in EasyCLIQ
01
Review the 360° set
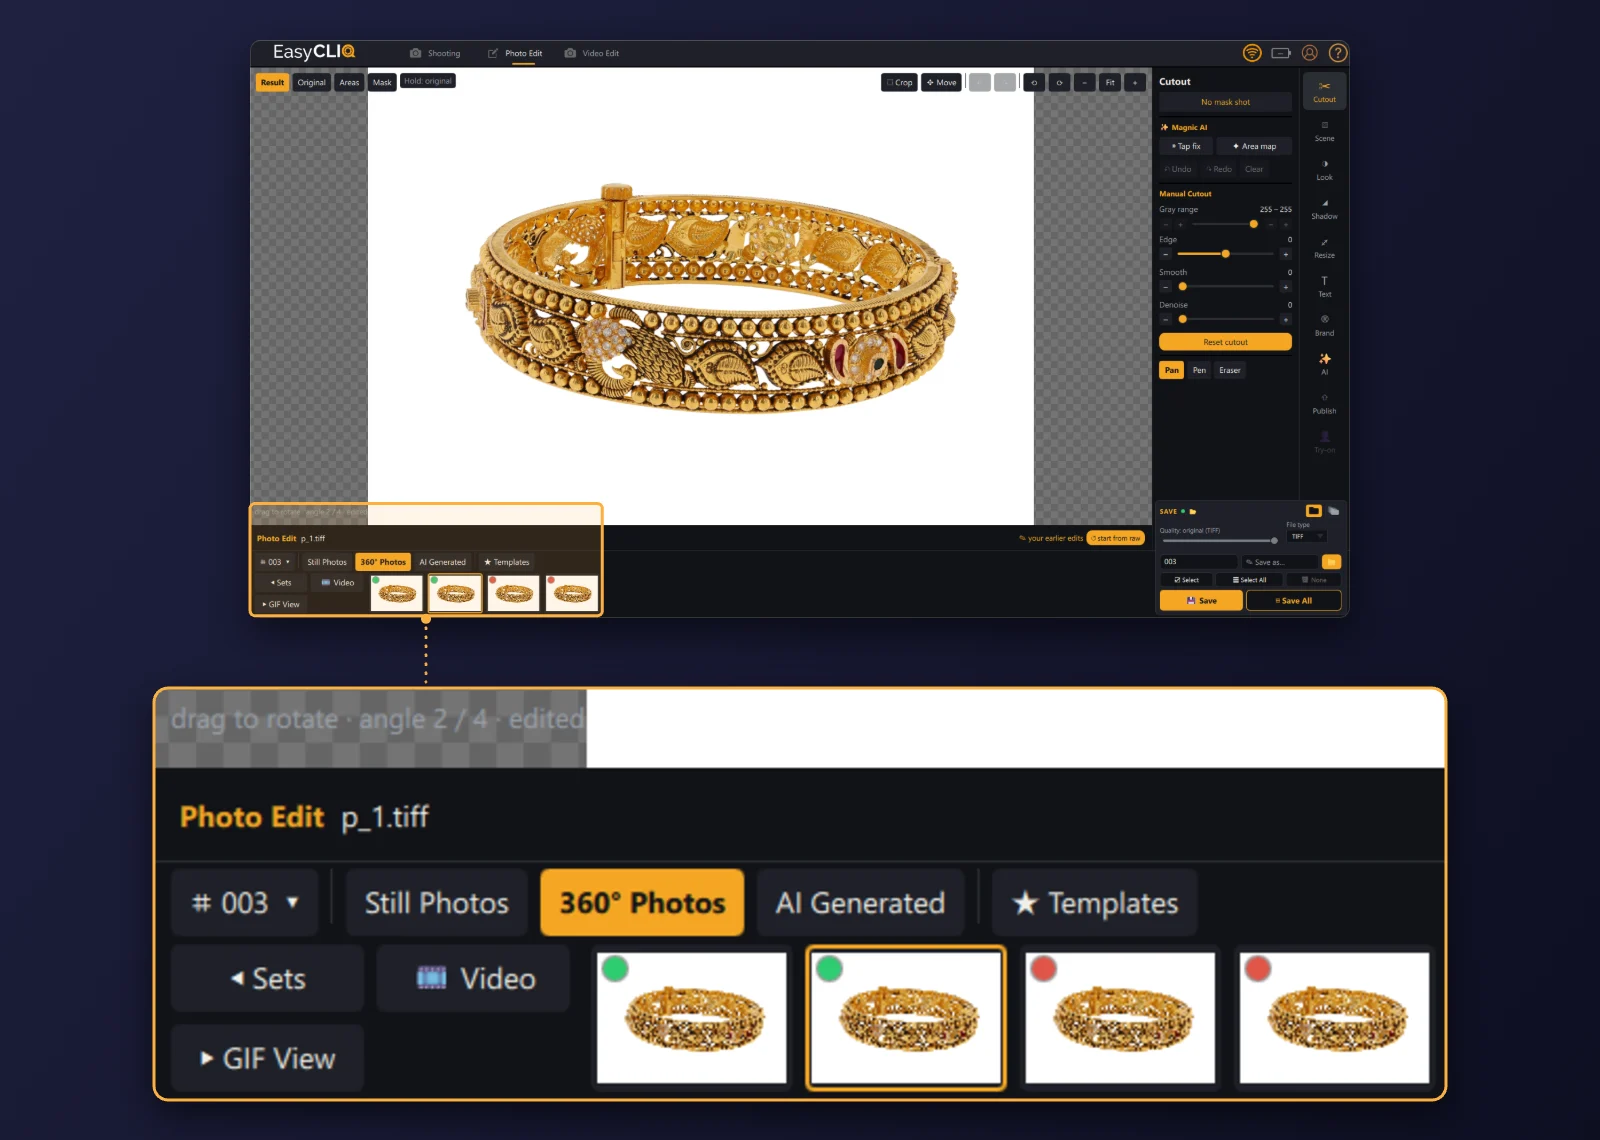
- 360° Photos: Each spin’s frames sit together as a set in the 360° Photos library. Drag to rotate through the angles, or switch to Video or GIF View.
02
Resize for each channel
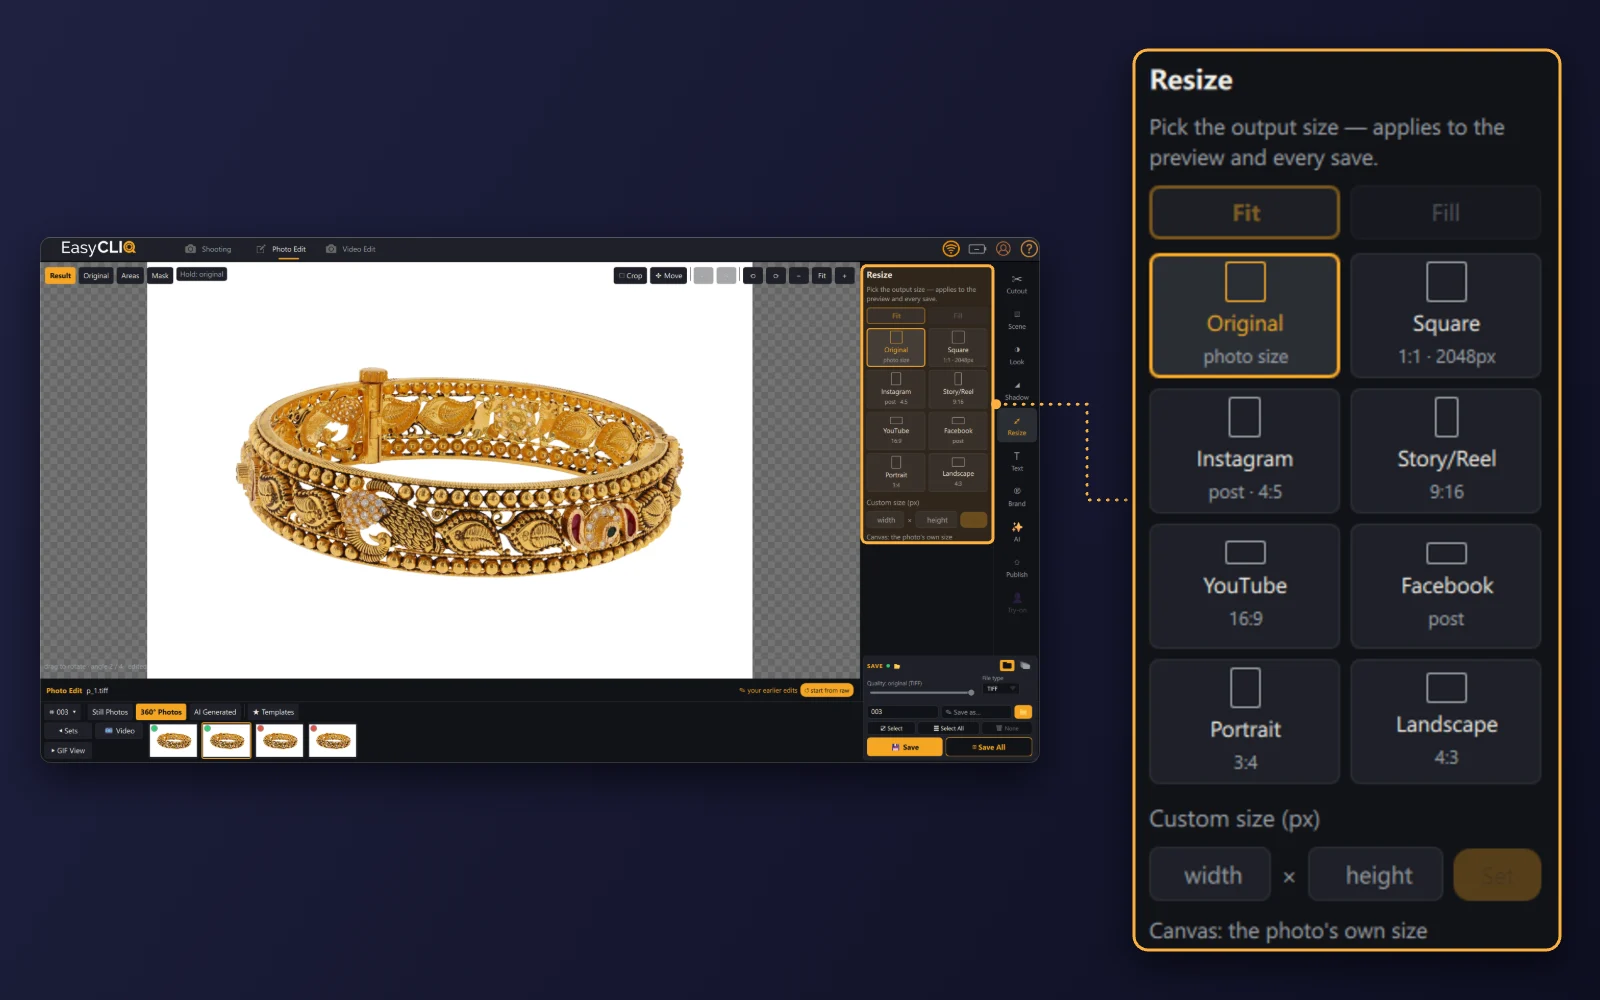
- Presets: Pick the original size, square (1:1, 2048 px), Instagram post (4:5), Story or Reel (9:16), YouTube (16:9), Facebook post, portrait (3:4), landscape (4:3) or a custom size.
03
Add price or purity
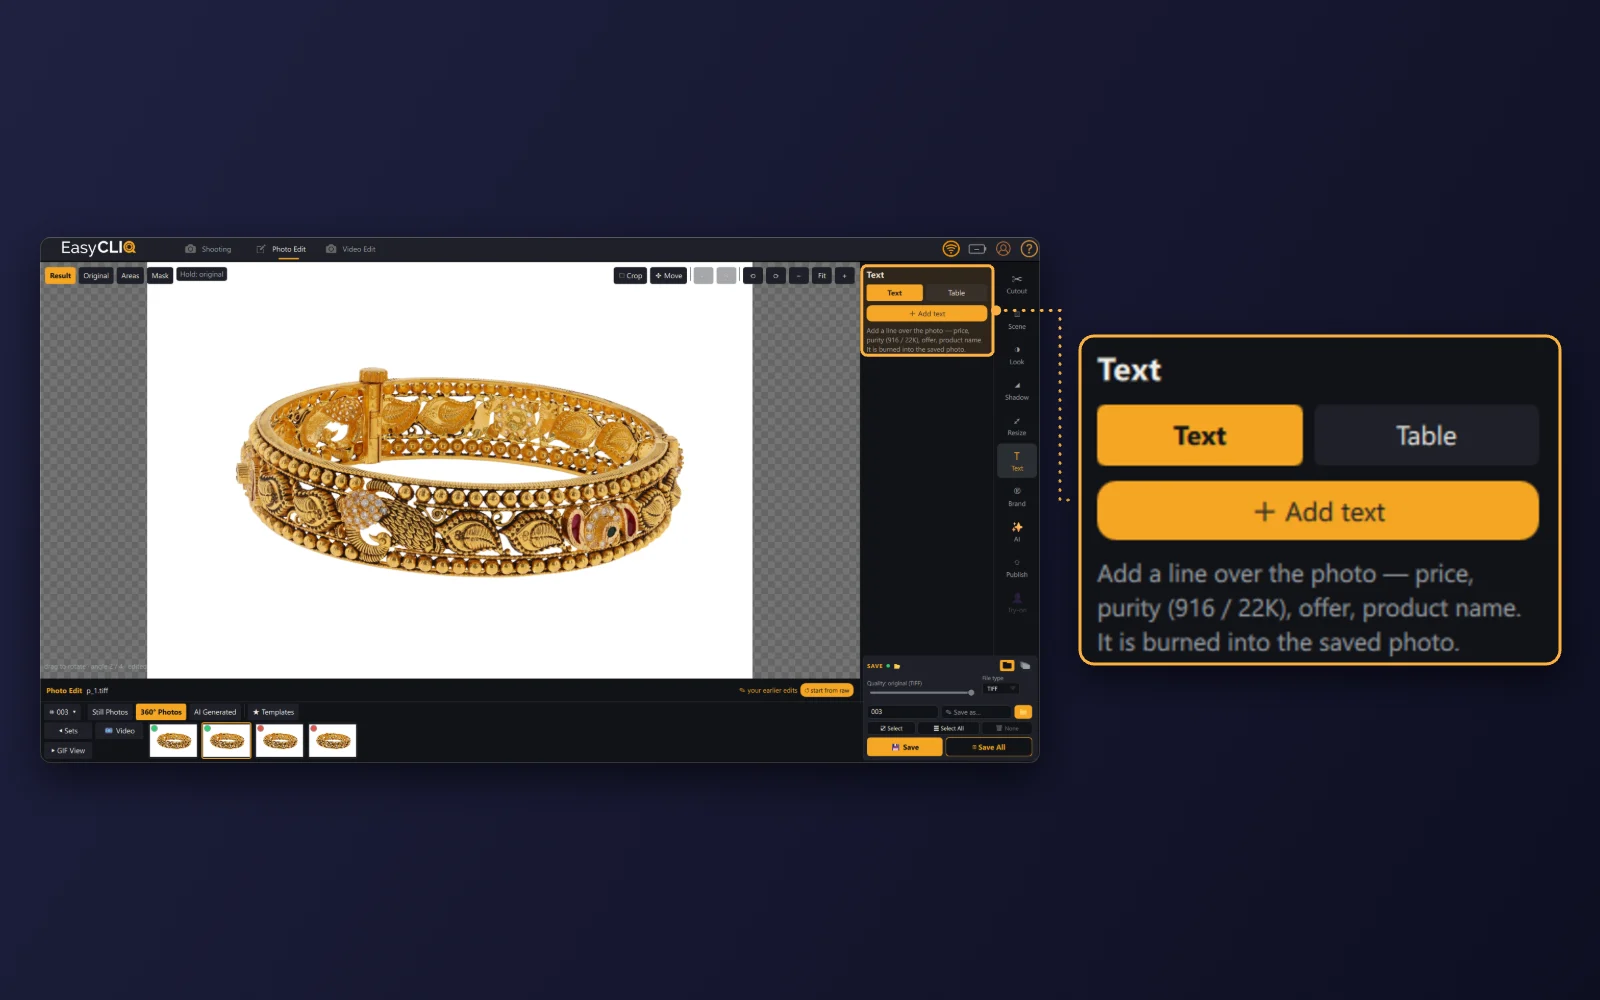
- Text: Add a line over the photo, such as the price, the purity (916 / 22K), an offer or the product name. It is burned into the saved image.
04
Export the video
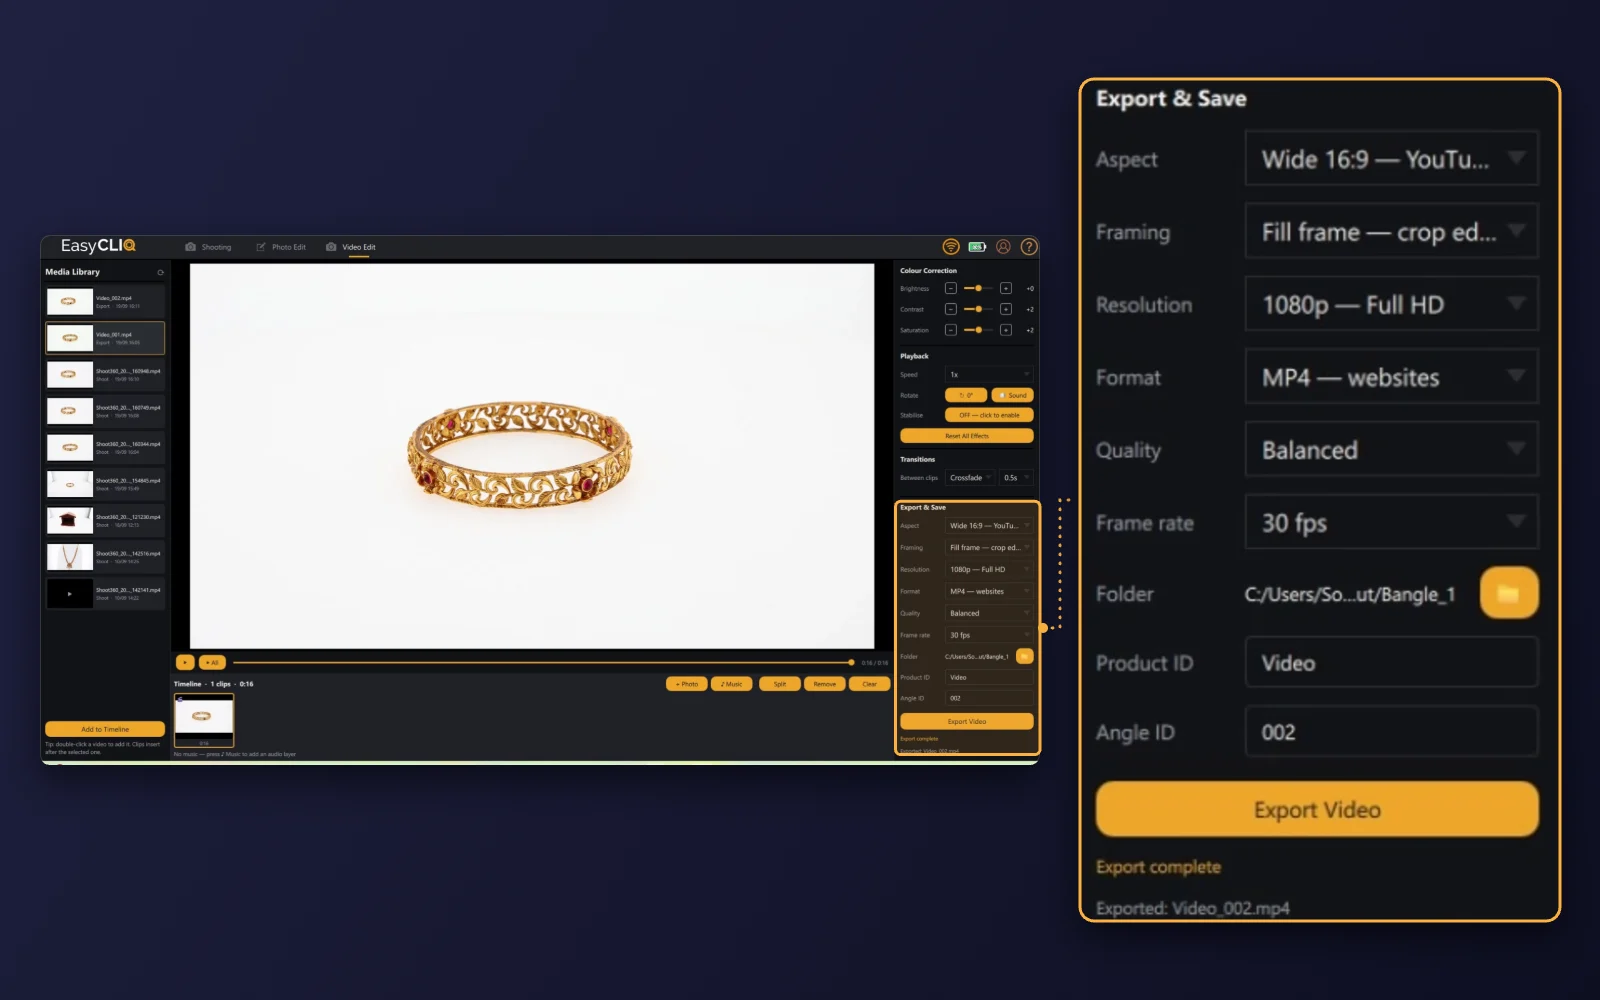
- Edit: In Video Edit, adjust brightness, contrast and saturation, the playback speed and stabilisation, and add transitions or music if you need them.
- Export: Choose the aspect (such as wide 16:9 for YouTube), the framing, 1080p resolution, MP4 for websites, the quality and frame rate, and name the file by product and angle ID.
One shoot, every channel
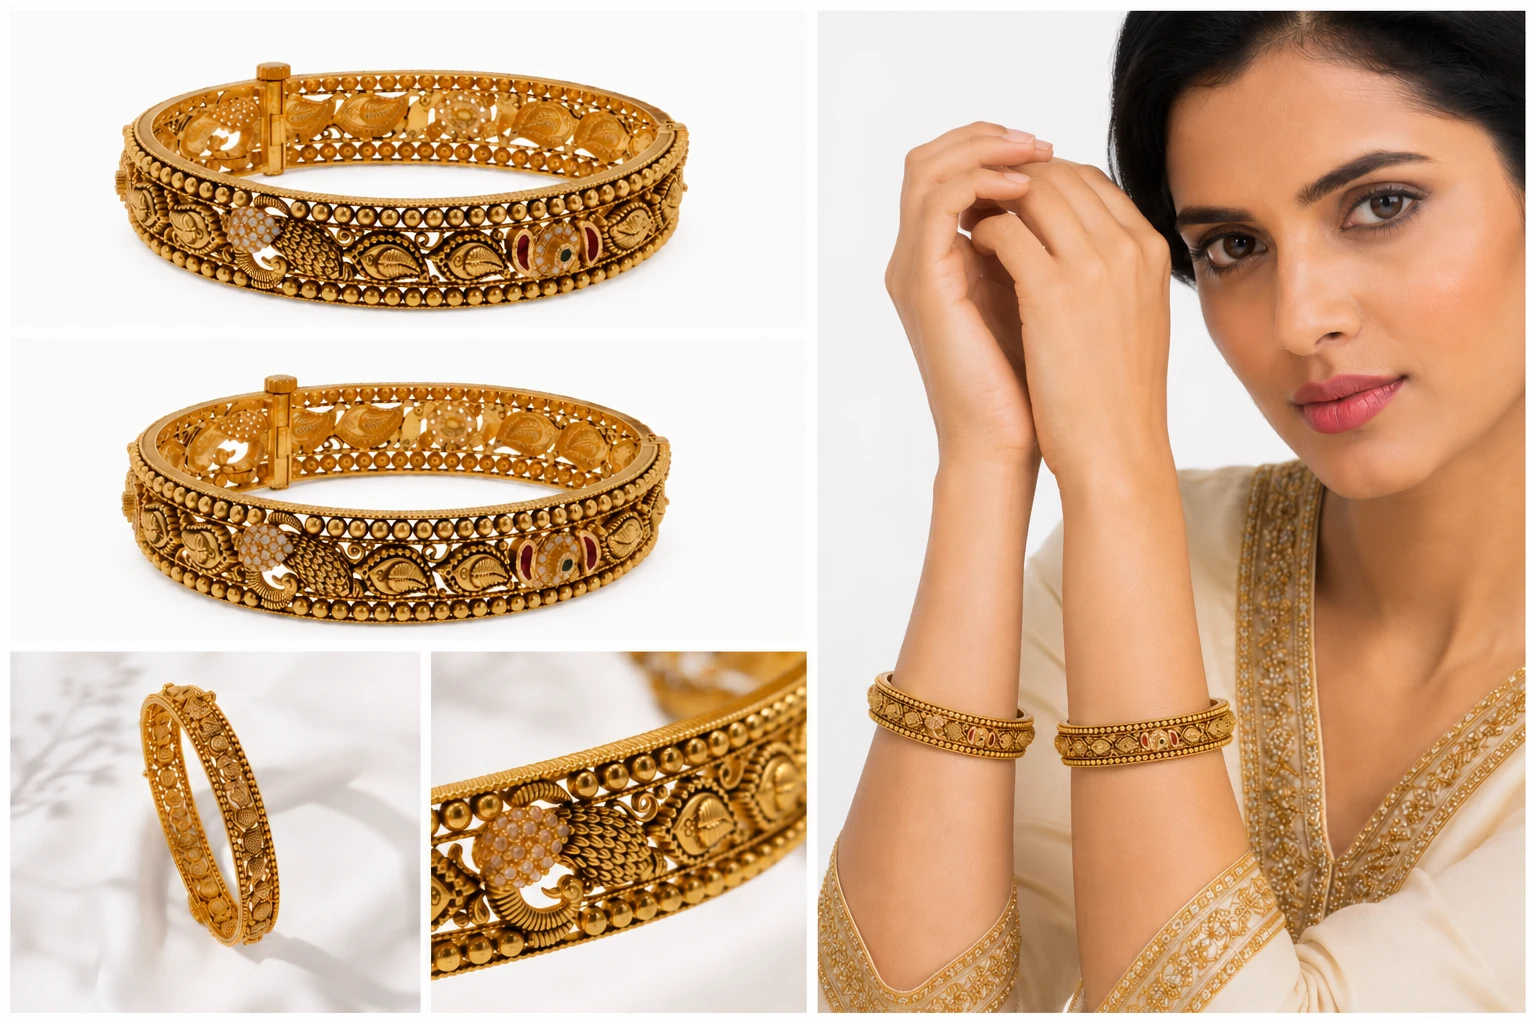
The 360° video goes on the product page, its best frames fill the listing gallery, and the same shoot can feed styled images for social media, close-ups that show the craftsmanship and lifestyle images for campaigns.
Frequently asked questions
What equipment is needed for 360° jewellery photography?
A DSLR or mirrorless camera you can control manually, a macro lens, a motorised turntable, soft diffused lighting, a stable tripod or fixed camera mount, and software to capture and edit the spin. An automated studio such as EasyCLIQ combines them in one machine.
How many images are needed for a smooth 360° rotation?
Between 24 and 36 frames per full turn is a common balance between smoothness and file size, and 72 gives an extra-smooth spin. If you record video instead, a slow, steady turntable speed gives the same smooth result.
What camera settings work best for ring photography?
Use manual mode with a low ISO, a small aperture for depth of field and a fixed white balance, so nothing changes between frames. As a reference, the bangle in the EasyCLIQ screens above was shot at ISO 250, f/16 and 1/125 s; for very small rings, focus stacking keeps the whole piece sharp.
Can a smartphone shoot 360° jewellery videos?
A phone on a tripod with a turntable can make a basic spin, but exposure, focus and colour drift between angles, and close-ups of fine detail suffer. For catalogue work, a camera you control manually or an automated studio gives consistent results.
Which turntable is best for jewellery product photography?
One that turns smoothly at an adjustable speed, stops at precise angles, sits centred under the camera and is controlled by your capture software. A top turntable for hanging pieces such as necklaces and earrings and a bottom one for bangles and rings cover most jewellery; the EasyCLIQ MINI, X1 and X3 include both.
Bring your collection to life in 360°
A stunning 360° jewellery video comes down to a clean, centred piece, a locked camera, soft light that works from every angle, a slow and steady turn and a light, well-sized file on the page. Get those right once, save them as a template, and every piece in the collection can follow.
Book a free demo and we will shoot a 360° video of a piece from your own collection.